Lecture
Contributors: Alicia Wang, Conner Swenberg, Alanna Zhou
Lecture Slides
How do other people use our application?
As we learned in the first lecture, requests are made to servers. For our application to be networked, we too need to get our code running on a publicly accessible server. This process of publishing code into a real, running application is called deployment.
Outline of deployment process:
Compress code into a production environment
Prepare production environment to run-ready
Spin up server(s)
Download & run prepared production environment on server(s)
The topic of Containerization covers the first two steps in this process. However before we begin, there is one thing we need to cover first.
Environment Variables
Now that we are considering running our application code on an external computer, it is essential to have a secure way to share private information. We do this through what are called environment variables.
There are many instances in which we need to use sensitive information in our application code such as username/passwords or API secret keys. However, if our code is open source (and even when it's not!), we wouldn't want to hardcode the data in for the world to see.
A solution is to use environment variables, that is to define our secret variables in an "environment file" locally (typically suffixed with .env). Then instead of the secret API key existing within our source code, we can simply refer to the variable containing the secret key in another file.
To allow our application deployed on the external server access to these environment variables, we can similarly create a .env file on the server while SSHed in. This is especially useful if our deployed server should be using different secrets than our development server.
1. Compressing Code Into a Production Environment
What is Docker?
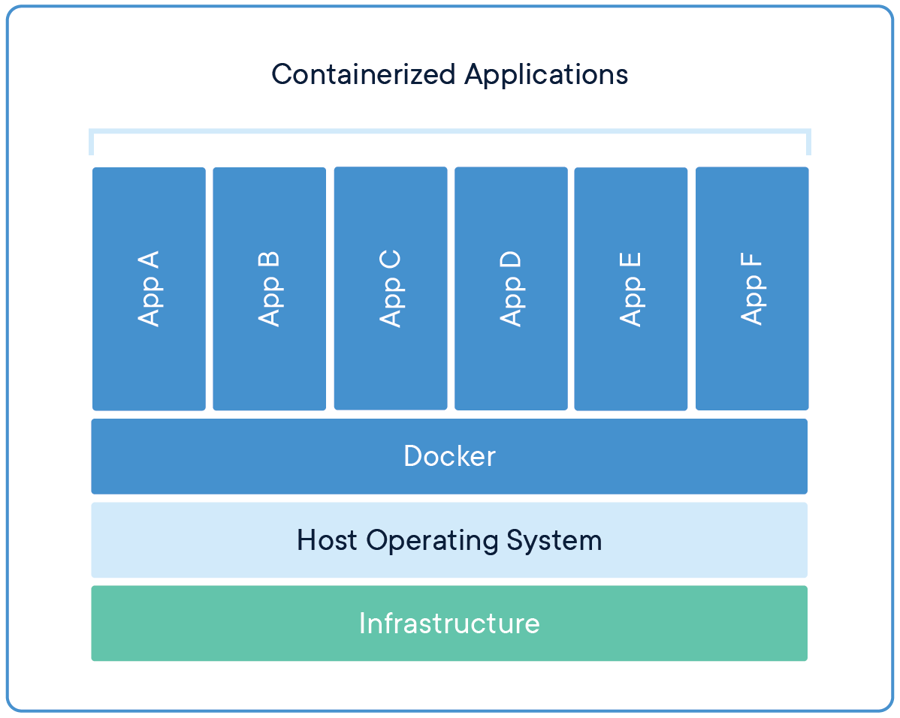
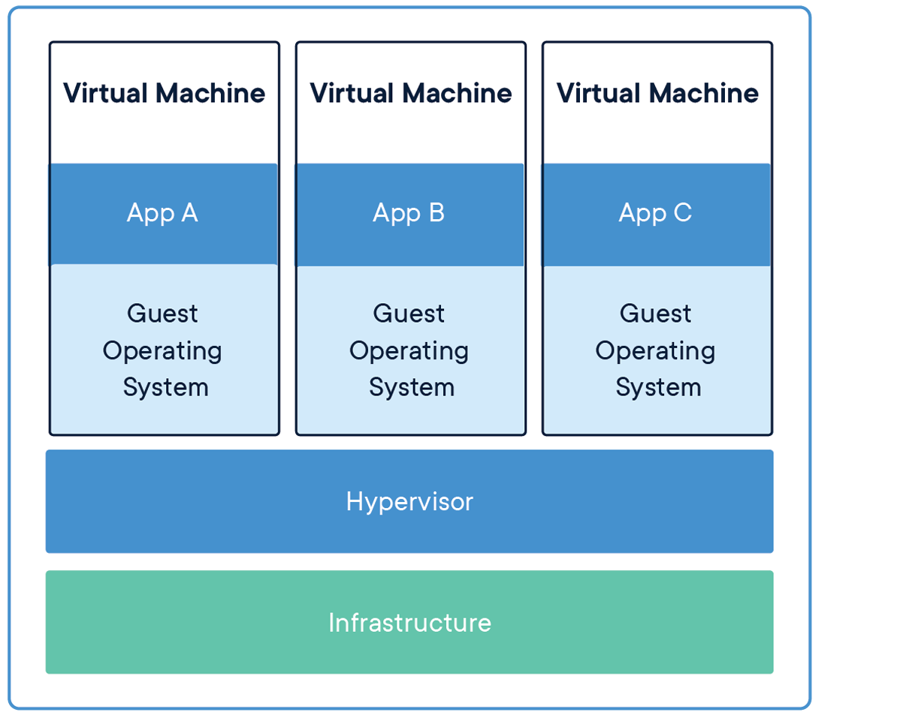
Docker is a tool that allows developers to package code into a standardized unit of software called a container. A container contains not only your application’s source code, but also all of its dependencies so the application can run quickly and reliably from one computing environment to another. That means your application’s behavior will be consistent whether you run it on a Windows or Linux environment, or on your local computer or a remote server. Docker containers are similar to virtual machines in that they both isolate resources, but containers are more portable and lightweight because they virtualize the operating system instead of the hardware. Multiple Docker containers (apps) can be run on the same machine with other containers as isolated processes, but still share the same OS kernel.


To Dockerize an application, we build images from our source code and then run the containers created from the images. We can think of images and containers like classes and objects or blueprints and products. We need to specify a Dockerfile, which is the blueprint on how to use our source code and its dependencies to create an image that will run our application.
Docker Images
Docker is all about its images! A Docker image is a blueprint that is used to run code in a Docker container. In other words, it is built from instructions (that you as a developer specify, called a Dockerfile) for a complete and executable version of your application.
An image includes elements that are needed to run an application as a container:
code
config files
environment variables
libraries
Once an image is deployed to a Docker environment, it can then be executed as a Docker container.
What does image mean?
You can think of a Docker image as a "snapshot" in other virtual machine environments, a record of a Docker virtual machine, or Docker container, at a point in time.
If you think of a Docker image as a digital picture, then a Docker container can be seen as a printout of that picture.
Images cannot be changed
Docker images have the special characteristic of being immutable. They can't be modified, but they can be duplicated and shared or deleted. The immutability is useful when testing new software or configurations because no matter what happens, the image will still be there, as usable as ever.
So if you need to "modify" an image, you simply just make your changes and build another image. You can name it the same name, but you're essentially overwriting, not modifying.
2. Prepare Production Environment to be Run-Ready
Docker Hub
Just as you can store and share code using git version control on GitHub, you can also store and share images on Docker Hub.
Docker Hub is a cloud-based service that lets you store images in private or public repositories (like GitHub!).
This will come in handy when you want to deploy a Docker image onto a remote server (which you will set up later through Google Cloud) -- you'll create your image locally on your own laptop, push it to a repository on Docker Hub, go to your remote server that you've set up, "pull" the image from Docker Hub, and deploy it!
Docker Compose
We use Docker Compose in this course to help us get a glimpse of what a developer would use to manage an application that has multiple containers, each supporting a certain feature, acting as a single cluster.
To give an example, our iOS app, Ithaca Transit, has multiple containers running, and here are a few examples of the instances that we need:
one to get data on where the TCAT buses are, and how delayed they are
one to compute bus routes
one to compute walking routes
To manage each of these containers on their own respective servers can be quite tedious and frustrating for developers--which is why we take advantage of Docker Compose to help us centralize all of these different instances of running containers into one place, one server.
Docker explains Docker Compose in their docs as:
a tool for defining and running multi-container Docker applications. With Compose, you use a YAML file to configure your application’s services. Then, with a single command, you create and start all the services from your configuration.
Which is exactly what we need!
What's a YAML file?
The use of a "YAML" file (simply a text file with the file extension of .yml) is incredibly powerful, as it is what we outline to tell our remote servers later how to and what to deploy on our servers using Docker commands.
Here's an example of what an example docker-compose.yml might look like:
Deciphering a docker-compose.yml file:
The
build: .on line 4 just tells Docker to build your application in the current directory.You can have multiple services (which is the advantage of using Docker Compose!), and you can do so by specifying another chunk after
web: ... rediswith a different port number, like3000instead of5000for example.
This is not to be confused with a Dockerfile, which although is also a text document, it instead contains all the commands a user could call on the command line to assemble an image of an application. In short, it's a list of TODOs (ex. install python, install flask) needed in order to get one image of an application up and running anywhere--could be a local computer or a remote server.
So what's the relationship between a Dockerfile and a docker-compose.yml?
You must have a Dockerfile for each image of an application, and you can specify multiple images in a docker-compose.yml, since it's an orchestration tool that we mentioned earlier for the purpose of clustering. This can seem confusing, but don't worry too much about it for now.
For the scope of this course, we won't be deploying multiple images for an application. We will focus on making one Dockerfile to build one image, which we will put in our docker-compose.yml so that we can deploy one container on our server.
But in the real world however, like in the case of Ithaca Transit, we would specify multiple Dockerfiles, each for a particular service, build their respective Docker images, and specify all of those images in one docker-compose.yml, so that we can deploy them as multiple containers at once.
Containerization Summary
After you have isolated any environment variables out of your code, you can begin the two high level steps of containerization:
Compress code into a production environment
Prepare production environment to run-ready
Stringing all of the steps in both together looks as follows:
Define a
Dockerfileto specify your application's required environmentBuild a docker image with your
Dockerfileblueprint with the command:docker build .Push your image to Docker Hub so that we can pull it onto our server later
Define how to run your image(s) in a
docker-compose.ymlfile which can handle a multi-container application (in the scope of this course, you will only have one service)
In the next chapter, we will continue the deployment process by pulling our docker image onto a remote server and running our docker-compose.yml file to start up our application!
Last updated
Was this helpful?